Valentine’s Day special series – Sourdough Country Bread.
I love breads, I love baking them, I love eating them. Since my run in with the process of making of a Sourdough, I am totally in love with it. I feel the earthy, old school feel to it, is pure pleasure. And don’t get me started on the flavor. The best bread you will ever taste. It has its own distinct flavor profile, which you will not get in any regular commercial yeast leaven breads made from just flour and water. That is the beauty of sourdough bread. It is made from just flour, water, salt and obviously the sourdough starter. But the result is just mind blowing.
But as the Sourdough Bread has its own beauty and flavor. It has also has its own mind and mood. It is a very technical bread. The method though seem to the point, is a bit complex in the beginning, but once you get a hang of it. You will get better. Don’t be upset or give up if it doesn’t come out perfect the first time, or the second or the third, you will have to be patient with this bread, with the starter, with the whole process. It is time consuming but the results are worth it.
Firstly to even begin planning the bread, you will need a sourdough starter, for which the recipe is here.
Secondly, I will be doing a Tartine Bakery inspired Country Loaf. The method is called a wet dough method where the hydration of the dough is 75%. This bread has a great depth of flavor and you use your leaven at a younger stage where it still on the milky smelling side and not reached the sour smelling stage.
Third – After going through the recipe, go on YouTube and search for Tartine Country Loaf and see as many videos as you can. There is no point of me posting pictures of the method, because the videos will make more sense. They help a lot. But don’t just see one, see as many as you can.
Fourth – you will need a dutch oven to get the perfect loaf, unless your oven has an option of infusing steam while baking. Dutch oven will create the perfect steam, which in turn will create the perfect crust. If you are really interested in baking bread regularly buy a banneton for the final proofing of the bread. It gives it the perfect shape, the rustic look and it is a good investment.
Now finally the recipe –

Ingredients –
- 450 grams all purpose flour
- 50 grams whole wheat flour
- 350 grams water
- 100 grams leaven
- 10 grams salt
- 25 grams water
Method –
Start the leaven –
- One day before the making the dough, discard 85% of the starter, the recipe says you need only one tablespoon for the leaven but mine is usually more than that. Feed your starter 70 grams all purpose flour, 30 grams whole wheat flour and 100 grams water. And set it aside for at least 7 – 10 hours. Ideally do it in the night, so the leaven will be ready to use in the morning. You also need to see take the weather in mind. If you are living in Mumbai, like me, where it is usually hot. During the summer it will only take about 4 to 5 hours for the leaven to be ready to use. Hot weather means faster yeast activity.
- To check if its ready – It should have risen from its initial stage. It should smell milky and not sour and vinegar-y. If it smells sour feed it again and use it after 2 -3 hours. For the final check, take a spoonful of starter and drop it in a bowl of water, if it floats its ready and if it drowns, then its not.
Dough –
- If all the things check out and your leaven is ready to use. You prep for the dough.
- In a bowl weigh the 360 grams of water and add the leaven. The remaining leaven is your starter now, don’t discard it, continue feeding it.
- Mix the leaven in the water till its partially dissolved.
- Add the flours, and mix it with hand till there is no dry flour remaining. Cover it with a kitchen towel and leave it for 30 minutes. This is called the autolyse period, basically good time to increase the gluten development.
- After 30 minutes – add salt and 25 grams of water. Mix by pinching the dough between your fingers. Keep mixing and pinching till it forms a nice dough. Remember it will be wet and sticky as its a wet dough.
- Now we do the SF – stretch and fold. Transfer the dough in a separate bowl, wet your hands, and pick the dough from one side and stretch it (softly) and fold it on the other side. So it should be a total of four SFs on all four sides. That will be one turn. Cover and let it rest.
- Bulk Fermentation – For the next 4 hours, keep doing the SFs every 30 minutes one full turn each time. As the time will progress you will see the dough getting smoother, stretchy and tighter, showing the development of gluten and gas in the dough. If the dough is till loose, continue it for one more hour.
- After 4 hours, transfer the dough on a clean surface/counter. Do not flour it before. After the dough is on the counter. Sprinkle some flour on the top of the dough and with a dough scraper lift the dough and put the flour side down.
- Sprinkle flour on top and around the dough. With the help of the dough scraper, shape the dough in to a tight round by taking the scraper and pulling the dough towards you from down. Same time twisting it and making it into a round with your hand. (Hence the video for reference).
- Do it a few times and don’t over do it, or else the top of the dough will tear. You will have to the shaping all over again.
- Bench Rest – Cover and rest for 30 minutes to give the gluten some rest.
- After 30 minutes your dough should be thick like a pancake especially from the edges, then its ready to shape. If it is flat and tapered from the edges, re – shape it one more time and give it a 30 minute bench rest.
- Generously dust flour in the banneton.
- For the final proofing – sprinkle flour on top of the dough and invert flour side down. That will be the top of the bread. Now shape it according to your banneton, mine is oval, so flatten the dough a little in to a rectangle. Make sure you don’t flatten it a lot or all the air will escape.
- Stretch the sides of the lower part of the dough which is towards you. Roll the top, pinching the side turned with every turn. After rolling it fully, pinch the seams together, and give it a gentle roll, shaping it into an oval.
- For round shaped banneton – Make a rectangle, fold the bottom half way to the center. Fold the right side on the left and left on the right side, like an envelope. Finally cover seams with folding the top side. Pinch the seams and invert it and with the sides of your palm rotate the dough from down creating circles, thus shaping it into a round.
- Generously sprinkle flour on the top side of the dough. Invert the smooth flour side on your hand and place it in the banneton, seam side should be facing upwards. Sprinkle some more flour on the top. Cover and let it proof for 4 hours or leave it overnight in the refrigerator.
- If placed in the refrigerator, let it come to room temperature before baking.
- 20 minutes before baking – preheat the oven to 230 C and put the dutch oven with the lid inside the oven to preheat.
- After 20 minutes, carefully remove the dutch oven from the oven. Gently invert the dough on a parchment paper, score the bread, and carefully without burning your hand, place it in the dutch oven.
- Bake for 20 minutes with the lid on, this creates the perfect the steam, which therefore creates the perfect crust. After 20 minutes, remove the lid and bake for 20 minutes more for the crust to turn a beautiful golden and auburn color.
- When baked, remove from the oven, remove it from the dutch oven and then let it cool on a wire rack for an hour. I can only wait for 30 minutes before I start slicing the bread and eating it.
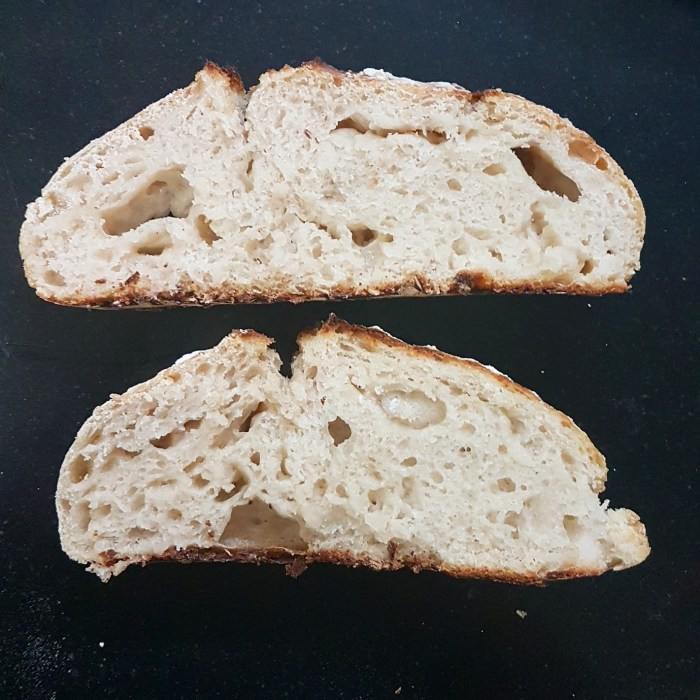
- The exterior of the bread will have a nice crunchy crust. The interior should have these webs which is basically the air bubbles in the bread created during the process. The web should consist of big and small bubbles. It will be a little chewy compared to the commercial yeast leavened bread but that is how it supposed to be.
You can see the webs in the bread I made below, though it is not where I want it to be, but as I said the process is slow and it will take time to perfect this bread. So don’t give up.